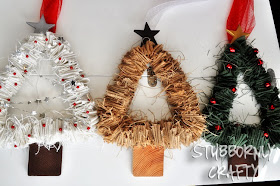
I'm baaaaaaack. Sorry about the break. It wasn't intentional. I'd craft everyday if I could but work took over my time. I'm taking time off, though, so get ready for some serious posting! So excited to have more time for my kids, husband, and crafting. And some house work in there too. Anyway, on to today's post:
I made these fun burlap trees and whipped up a tutorial for you while hosting craft night. Craft night starts at 8:30pm so please excuse the not so stellar photos.
Supplies Needed:
- 1 yard burlap
- cutting mat & rotary cutter or scissors
- 14 gauge wire
- lighter weight craft wire
- wire cutters
- small pliers
- wooden star
- trunk (3.5"x3.5"x1" block)
- hot glue gun/glue stick
- Bells or whatever you'd like to decorate your tree with
Cut your burlap into 2 inch strips. Cut your self a piece of 14 gauge wire 41 inches long. measure in on both sides 16 inches and bend into a triangle shape. Bend the tops of each triangle at the top one inch in. This will be the base for your star to attach to. One at a time, fold your burlap strips back and forth like an accordion making the length of each fold equal to the width (approximately 2x2). Using the end of your wire like a needle, thread the middle of your accordion onto the wire. It takes a bit of muscle and is easiest if you do a few layers at a time.
The top photo in the above collage shows what it should look like threaded on. Keep adding your strips until it's full enough for your liking. When finished, wrap one of the tops of your wires around the other. Drill a hole in the bottom of your star and hot glue it onto the wire sticking up. We had my friend's husband cut ours out but if purchasing from the craft store, I'd leave both wires up and hot glue the star on both. Then position your burlap so that the exposed wire is covered. This will secure your burlap and keep it from springing off. Then decorate, attach your bells or other desired holiday goodness to your tree with a hot glue gun. To attach your block, drill two small holes at the top of the block and thread your thinner wire through. Then attach that wire to your main wire at the base of the tree. Do it loosely or it will smash your burlap at the bottom and lay funky.
Add a ribbon around the wire at the top of your tree for hanging and your done. Let me know if I missed anything. Happy holiday crafting. Best time of the year. :)


Cute! I'm pinning this! I would LOVE for you to share this at my Submarine Sunday link party!
ReplyDeleteT'onna @ Submarine Sunday Aboard the USS Crafty
Very nice idea for making a wreath. Thanks for sharing.
ReplyDeleteciao Lisa
ReplyDeletescusami ma non parlo inglese, volevo farti sapere che ho condiviso i tuoi progetti su https://www.facebook.com/pages/Kreattiva/144623015570424 spero non ti dispiaccia a presto
Rosa
http://kreattiva.blogspot.com
So cute! And is it really that time of the year already?! Holy moly :)
ReplyDeleteI'm popping over from the blog party, this is fun!
This is such a cute and creative idea! I love it. I am hosting a SHOW-licious Craft Showcase and would love for your crafts to be a part of it. If you would like to share some of your projects just follow this link...http://sew-licious.blogspot.com/2012/10/show-licious-craft-showcase-5.html.
ReplyDeleteHave a great week!
xoxo,
Marti
What a fun idea to make a wreath in the shape of a Christmas tree! I love it!
ReplyDeleteHave a great Christmas!
hugs ~ Crystelle
This is a darling idea for a tree! Fun tutorial!
ReplyDeleteThis is so cute! I need to make one for my door! New follower here from the link party! Would love for you to visit me and join my site as well!
ReplyDeleteriversrecipereview.blogspot.com
Just stopping by to invite you to My Wednesday Linky party. http://diycraftyprojects.com/2012/10/whatcha-work-up-wednesday-linky-party-6.html
ReplyDeleteOh, I really love this! I would love for you to add this, and any other of your awesome ideas, to my Mom's Library weekly round-up.
ReplyDeletehttp://heymommychocolatemilk.blogspot.com/2012/10/moms-library-link-up-3-for-me.html
Thanks and be blessed,
Julie
Hey! I'm stopping by to let you know that I'm featuring your lovely Christmas tree wreath tutorial @ Submarine Sunday #5. Come on over and grab a feature button! I'm so glad you shared this tutorial. I just might make my own Christmas tree wreath! :-)
ReplyDeleteT'onna @ Navy Wifey Peters Aboard the USS Crafty
Hi! congrats on your spotlight at Navy Wifey Peters. Love your "trees". This is so cute - gotta make some.
ReplyDeleteJoAnn
These are just adorable, Lisa! Thanks so much for sharing!
ReplyDeleteThose are super cute!!
ReplyDeleteThere are many great options for low level light displays and decorations that are easy to setup.
ReplyDeleteskyline decor
Great idea! I have been addicted to burlap this year, this is a great addition to the list=)
ReplyDeleteLooks so great! Love how this is different from the ordinary wreath.
ReplyDelete<3 Christina at I Gotta Create!
Wildly Original link party is open.
lovely¡¡
ReplyDeletethank you
what a great idea! Decorating ideas for christmas are simply endless and I enjoy browsing the crafts and handmade ornaments shared by bloggers and crafters like you. I was also looking at Christmas tree decorating ideas and I end up in this blog and I was never disappointed. Creativity rocks! Keep it up and happy holidays!
ReplyDeletethese are adorable! i love the white one!
ReplyDeletethis is super cute, too!
ReplyDelete